限りなくじゃんけんが弱い@It_is_Rです。
Androidアプリ開発、11回目となりました。
そろそろ何かアプリを作ってみたいですよね。基本は大事ですが、一番つまらないですね。
そこで今回は、アプリ開発の基本を学びながら、じゃんけんゲームを作ってみましょう。
このシリーズの前回の記事はこちらです。
【Android Studio】 GridLayout の使い方。複雑なレイアウトを表現する方法
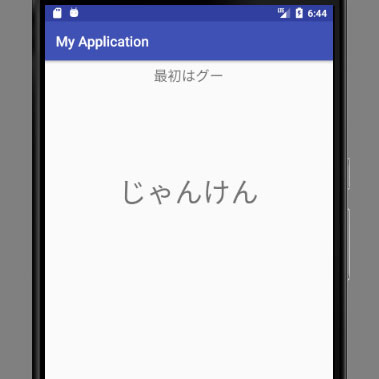
今回はこんな感じのゲームを作ります。

じゃんけんゲームの画面を作る
まずはじゃんけんゲームの画面を作ってみましょう。
今回、TextViewも使いたいので、最初から入っているTextViewはそのままにしておきます。
ボタンを作る
じゃんけんゲームですので、「グー」、「チョキ」、「パー」のボタンが必要です。
このボタンは横一列に並べたいので、LinearLayout(horizontal)を使います。

ボタンを3つ作ります。

ボタンが一番上ではタップしにくいので、下の方に配置したいですね。
今回はLinearLayoutの高さを低くし、LinearLayoutごと一番下に持ってくる方法にしたいと思います。
LinearLayoutを選択し、layout_heightを60dpにします。

LinearLayoutの下の白い丸を一番下にドラッグします。

すると、レイアウトを下の方に配置することができます。
ボタンのテキストとIDを変更
次に、それぞれのボタンのテキストとIDを変更します。
それぞれのボタンを選択し、下の画像の様にtextとIDの部分を変更してください。

- ID:rock text:グー
- ID:scissors text:チョキ
- ID:paper text:パー
といった感じにします。

TextViewの表示を変更
テキストビューのテキストを変更します。
Hello World! となっている部分を「じゃんけん」に変更しました。

また、テキストサイズの変更もします。
中央寄せはどちらでもいいと思いますがとりあえず。

IDはtextに変更しました。

こんな感じになります。

更にもう一つTextViewを追加します。
ボタンのレイアウトを配置した要領で、TextViewの上の白い丸を一番上までドラッグします。

IDを「subtext」
textを「最初はグー」
textSizeを「20sp」にしました。

こんな感じになります。

これで画面全体が完成しました。
ゲームが動くようにプログラムを作る
では、ゲームが動く様にしていきましょう。
MainActivity.java にプログラムを書いていきます。
MainActivity.java
package com.example.r.myapplication;

import android.support.v7.app.AppCompatActivity;
import android.os.Bundle;
import android.view.View;
import android.widget.Button;
import android.widget.TextView;

import java.util.Random;

public class MainActivity extends AppCompatActivity {
    @Override
    protected void onCreate(Bundle savedInstanceState) {
        super.onCreate(savedInstanceState);
        setContentView(R.layout.activity_main);

        final TextView text = (TextView)findViewById(R.id.text);
        final TextView subtext = (TextView)findViewById(R.id.subtext);
        Button rock = (Button)findViewById(R.id.rock);
        Button scissors = (Button)findViewById(R.id.scissors);
        Button paper = (Button)findViewById(R.id.paper);

        //opponentHand 1  "rock"
        //opponentHand 2  "scissors"
        //opponentHand 3  "paper"
        rock.setOnClickListener(new View.OnClickListener() {
            @Override
            public void onClick(View view) {
                int opponentHand = decideOpponentHand();
                String opponentHandText = changeTextOpponentHand(opponentHand);
                decideGame(1, opponentHand, subtext);
                text.setText(opponentHandText);
            }
        });
        scissors.setOnClickListener(new View.OnClickListener() {
            @Override
            public void onClick(View view) {
                int opponentHand = decideOpponentHand();
                String opponentHandText = changeTextOpponentHand(opponentHand);
                decideGame(2, opponentHand, subtext);
                text.setText(opponentHandText);
            }
        });
        paper.setOnClickListener(new View.OnClickListener() {
            @Override
            public void onClick(View view) {
                int opponentHand = decideOpponentHand();
                String opponentHandText = changeTextOpponentHand(opponentHand);
                decideGame(3, opponentHand, subtext);
                text.setText(opponentHandText);
            }
        });
    }
    String changeTextOpponentHand(int hand) {
        String handText = "";
        if (hand == 1) handText = "グー";
        else if (hand == 2) handText = "チョキ";
        else if (hand == 3) handText = "パー";
        return handText;
    }
    int decideOpponentHand() {
        Random rnd = new Random();
        int hand = rnd.nextInt(3)+1;
        return hand;
    }
    void decideGame(int playerHand, int opponentHand, TextView decidetext) {
        String decision;
        if(playerHand == opponentHand) decision = "あいこ";
        else if((playerHand == 3 && opponentHand == 1) || (playerHand+1 == opponentHand)) decision = "勝ち";
        else decision = "負け";
        decidetext.setText(decision);
    }
}
17〜21行目
findViewByIdを使って、テキストやボタンを取得します。
26, 35, 44行目
グーチョキパーそれぞれのボタンが押された時の処理です。ここで、相手の出す手を考え、判定し、setTextで画面上のテキストを変更します。
54行目
相手の手の変数の数値によって、文字列を作るメソッドです。
61行目
相手の手をランダムで決定するメソッドです。
66行目
ゲームの判定をするメソッドです。
完成
完成したアプリはこんな感じです。

まとめ
今回はAndroidアプリ開発らしく、じゃんけんゲームを作りました。
ようやくアプリ開発をしたかって感じです。
このシリーズの一覧はこちら
- Android StudioをMacにインストールする方法
- 【Android Studio】新規プロジェクトを作成する方法
- 【Android Studio】エミュレータを起動してプログラムを実行する方法!
- 【Android Studio】開発したアプリの実機テストを行う方法。
- 【Android Studio】アプリ開発の基本とそれぞれのファイルの役割を覚える。
- 【Android Studio】TextView を使ってテキストを変更、追加する方法。
- 【Android Studio】Button(ボタン)を作る基本中の基本。
- 【Android Studio】TextView 文字の色やサイズ、書体を変更する方法。
- 【Android Studio】レイアウト( Layout )の種類を覚えよう!
- 【Android Studio】 GridLayout の使い方。複雑なレイアウトを表現する方法
- 【Android Studio】じゃんけんゲームの作り方(アプリ開発の基本)